1- Oreo Dessert Cups – The Ultimate No-Bake Cookies & Cream Treat! 🍪🥄
Hello, Oreo Lovers!
If you love rich, creamy, and chocolatey desserts, then these Oreo Dessert Cups are about to become your new favorite sweet treat! Made with layers of crushed Oreos, velvety cream cheese filling, and fluffy whipped cream, these no-bake dessert cups are easy to make, incredibly delicious, and perfect for any occasion.
Whether you’re serving them for a party, holiday gathering, or just satisfying your Oreo cravings, these individual-sized cups of cookies & cream goodness will be a hit with both kids and adults!
Introduction
Oreo desserts have been a fan favorite for decades, thanks to their perfect blend of chocolate cookie crunch and creamy filling. These Oreo Dessert Cups take that classic flavor and turn it into a creamy, dreamy, and decadent treat that’s quick to assemble and requires no baking!
I first made these for a birthday party, and they were gone in minutes! The combination of crushed Oreos, sweet cream cheese, and homemade whipped cream creates a luxuriously smooth and crunchy texture that’s irresistible. Now, I make them whenever I need a fast, fuss-free dessert that always impresses.
Ingredients
To prepare these creamy, crunchy, and chocolatey Oreo Dessert Cups, you’ll need:
For the Oreo Crust:
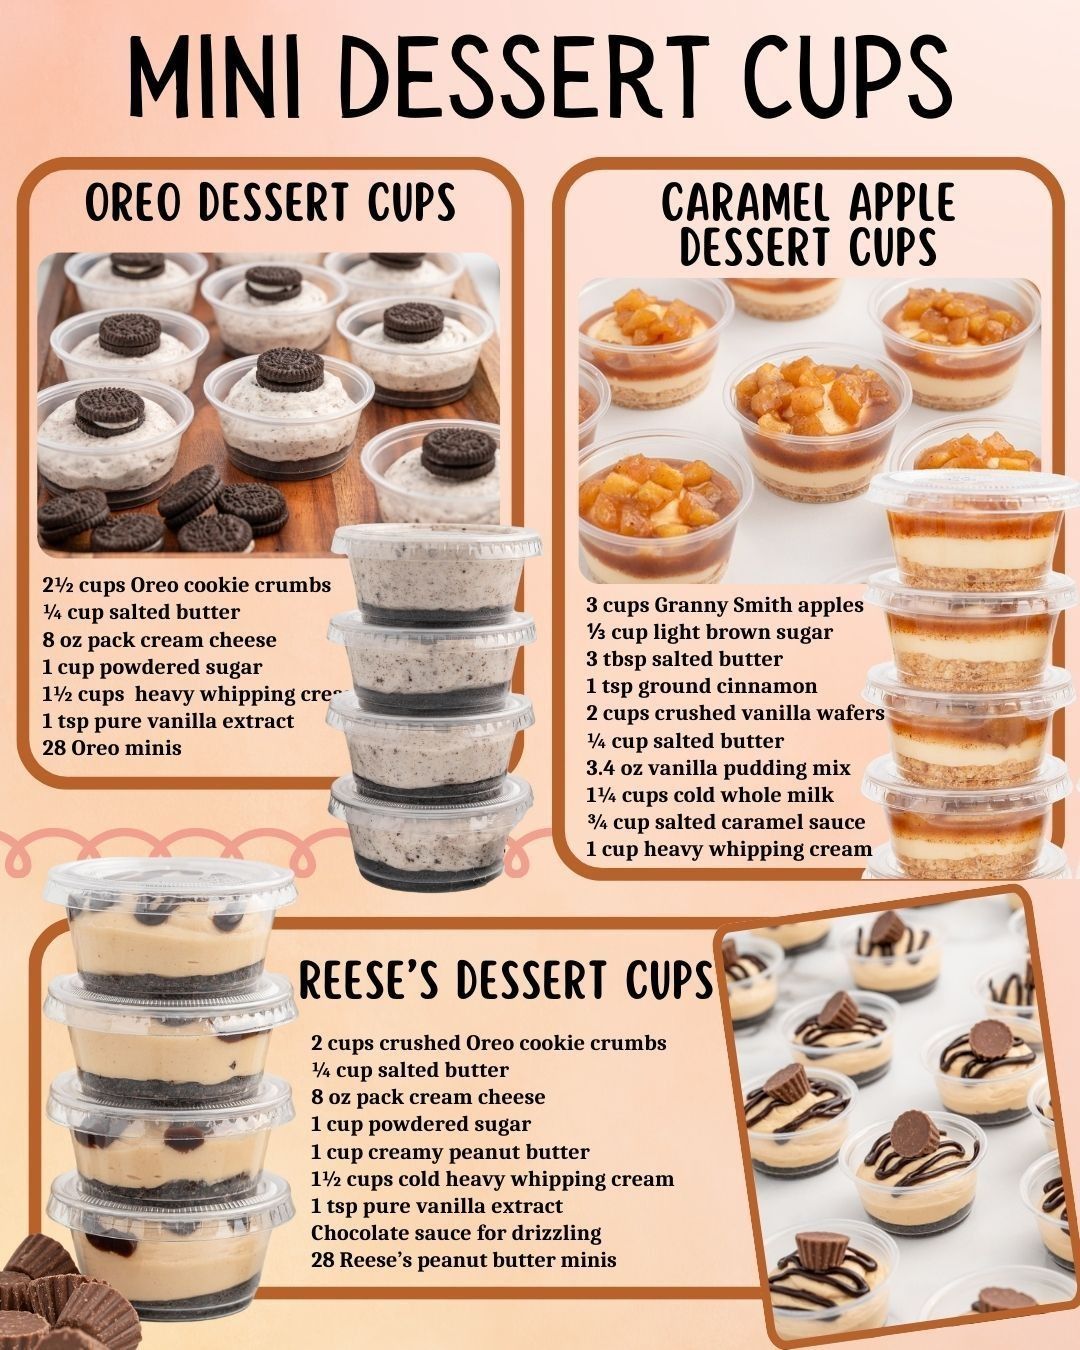
- 2½ cups Oreo cookie crumbs 🍪
- ¼ cup salted butter, melted 🧈
For the Creamy Filling:
- 8 oz pack cream cheese, softened 🧀
- 1 cup powdered sugar
- 1½ cups heavy whipping cream 🥛
- 1 tsp pure vanilla extract
For Garnish:
- 28 Mini Oreos 🍪 (for topping)
Optional Additions:
- Extra chocolate drizzle: Add melted chocolate on top.
- Crunchy twist: Sprinkle crushed Oreos between layers.
- Minty version: Use Mint Oreos instead of classic.
- Peanut butter twist: Mix in ¼ cup peanut butter to the filling.
How to Make Oreo Dessert Cups
Follow these simple steps to create your own indulgent Oreo dessert cups:
1️⃣ Make the Oreo Crust
- Crush Oreo cookies in a food processor until fine crumbs form.
- Stir in melted butter and mix until combined.
- Divide the mixture evenly into small dessert cups and press down lightly.
2️⃣ Prepare the Creamy Filling
- In a large mixing bowl, beat the cream cheese and powdered sugar until smooth and fluffy.
- In a separate bowl, whip the heavy whipping cream and vanilla extract until stiff peaks form.
- Gently fold the whipped cream into the cream cheese mixture until fully combined.
3️⃣ Assemble the Dessert Cups
- Spoon or pipe a layer of the creamy filling over the Oreo crust in each cup.
- Top with another sprinkle of Oreo crumbs for extra crunch.
- Repeat the layering until all cups are filled.
4️⃣ Garnish & Chill
- Top each dessert cup with a mini Oreo cookie.
- Refrigerate for at least 2 hours before serving to let the flavors meld.
5️⃣ Serve & Enjoy!
- Grab a spoon and dig into pure Oreo bliss!
Helpful Tips
Cooking Tips
- Use room temperature cream cheese for a smoother filling.
- Chill for at least 2 hours so the flavors can blend beautifully.
- For best results, whip the cream separately before folding into the mixture.
Serving Suggestions
- ✅ Drizzle with chocolate or caramel sauce for extra indulgence.
- ✅ Serve with fresh berries for a refreshing contrast.
- ✅ Top with whipped cream and extra Oreo crumbs for a bakery-style look.
- ✅ Enjoy with a cup of coffee or milk for the perfect pairing!
What Chefs Say About This Recipe
- Gordon Ramsay – “A simple yet decadent dessert that perfectly balances crunch and creaminess.”
- Martha Stewart – “No-bake desserts don’t get better than this—quick, creamy, and full of flavor.”
- Bobby Flay – “A fantastic mix of textures and flavors, making it the ultimate Oreo treat.”
- Ina Garten – “Perfect for entertaining—easy to prepare and a guaranteed crowd-pleaser.”
- Jamie Oliver – “Love how effortless this is while delivering maximum flavor!”
10 Frequently Asked Questions (FAQs)
- Can I make these ahead of time? Yes! They store well in the fridge for up to 3 days.
- Can I freeze these dessert cups? Yes! Freeze for up to 2 months, then thaw before serving.
- What’s the best way to crush Oreos? Use a food processor or crush them in a zip-top bag with a rolling pin.
- Can I use Cool Whip instead of homemade whipped cream? Yes, but homemade has a fresher taste.
- What if I don’t have mini Oreos? Just crumble a regular Oreo on top!
- Can I use flavored Oreos? Absolutely! Try Golden Oreos, Mint Oreos, or Birthday Cake Oreos.
- How do I make this extra chocolatey? Add cocoa powder to the filling or mix in chocolate chips.
- Can I use mascarpone instead of cream cheese? Yes! It will have a slightly richer flavor.
- Do I have to chill them before serving? Chilling helps the flavors blend, so it’s highly recommended.
- Can I make this in a large dish instead of cups? Yes! Layer everything in a 9×9-inch pan and cut into servings.
Nutritional Information (Per Serving)
- Calories: 320 kcal
- Carbohydrates: 32g
- Protein: 4g
- Fat: 20g
- Saturated Fat: 12g
- Sugar: 22g
Storage and Leftovers
Refrigerate
- Store in an airtight container in the fridge for up to 3 days.
Freeze
- Freeze in a sealed container for up to 2 months.
- Thaw in the fridge before serving.
Related Recipes
- Crispy Fish Batter Recipe
- Teriyaki Salmon Bowls
- Copycat Olive Garden Chicken Gnocchi Soup
- Oyster Stew – A Classic Comfort Dish
Conclusion
These Oreo Dessert Cups are the perfect no-bake treat, combining creamy, crunchy, and chocolatey goodness into a delightfully easy dessert. Whether you’re making them for a party, meal prep, or a simple weeknight indulgence, these dessert cups are guaranteed to satisfy your sweet tooth.
Try this recipe today and let us know how you liked it! 🍪🥄😊
2- Caramel Apple Dessert Cups – A Perfectly Sweet & Creamy Fall Treat 🍏🍮🍯
Hello, Dessert Lovers!
If you’re craving a sweet, creamy, and indulgent dessert with the perfect balance of tart apples, buttery caramel, and velvety vanilla pudding, then these Caramel Apple Dessert Cups are exactly what you need!
These individual-sized layered desserts combine spiced caramelized apples, crushed vanilla wafers, rich vanilla pudding, and homemade whipped cream for a treat that’s as beautiful as it is delicious. The warm flavors of cinnamon, caramel, and apple make this dessert a perfect choice for fall gatherings, Thanksgiving, or a cozy night in.
And the best part? No baking required!
Introduction
Caramel apples have been a fall classic for generations, but this recipe takes that beloved combination of tart apples and buttery caramel and transforms it into a creamy, layered dessert that’s both easy to make and irresistibly delicious.
I first made these Caramel Apple Dessert Cups for a family gathering, and they were gone within minutes! The mix of cinnamon-spiced apples, crunchy cookie layers, and smooth pudding creates the perfect balance of flavors and textures. Whether you’re serving these for a holiday event, meal prep, or just a midweek treat, they’re guaranteed to be a hit!
Ingredients
To prepare these rich, creamy, and caramel-drizzled apple dessert cups, you’ll need:
For the Caramelized Apple Layer:
- 3 cups Granny Smith apples, peeled & diced 🍏
- ⅓ cup light brown sugar
- 3 tbsp salted butter 🧈
- 1 tsp ground cinnamon 🌿
For the Cookie Crust Layer:
- 2 cups crushed vanilla wafers 🍪
- ¼ cup salted butter, melted 🧈
For the Vanilla Pudding Layer:
- 3.4 oz vanilla pudding mix
- 1¼ cups cold whole milk 🥛
For the Caramel & Whipped Cream Layers:
- ¾ cup salted caramel sauce 🍯
- 1 cup heavy whipping cream 🥄
Optional Substitutions & Additions:
- No Granny Smith apples? Use Honeycrisp or Fuji for a sweeter taste.
- Want a crunchier texture? Add toasted pecans or walnuts.
- Looking for an extra flavor boost? Drizzle with melted white chocolate.
- Gluten-free version? Use gluten-free vanilla cookies.
How to Make Caramel Apple Dessert Cups
Follow these easy steps to create your own sweet, spiced, and caramel-drizzled dessert cups:
1️⃣ Caramelize the Apples
- In a medium saucepan, melt 3 tbsp salted butter over medium heat.
- Add diced apples, brown sugar, and cinnamon.
- Stir and cook for 5-7 minutes, until the apples are soft and caramelized.
- Remove from heat and let cool.
2️⃣ Prepare the Cookie Crust
- In a small bowl, mix crushed vanilla wafers with melted butter until evenly coated.
- Divide the mixture evenly among small dessert cups and press lightly to form the base.
3️⃣ Make the Vanilla Pudding
- In a mixing bowl, whisk together vanilla pudding mix and cold milk until smooth.
- Let it sit for 5 minutes to thicken.
4️⃣ Make the Whipped Cream
- In a separate bowl, beat heavy whipping cream with a hand mixer until stiff peaks form.
5️⃣ Assemble the Dessert Cups
- Layer 1: Add a spoonful of caramelized apples over the cookie crust.
- Layer 2: Spoon vanilla pudding over the apples.
- Layer 3: Drizzle with salted caramel sauce.
- Layer 4: Top with a dollop of homemade whipped cream.
- Repeat layers if desired for a taller dessert.
6️⃣ Garnish & Serve
- Drizzle extra caramel sauce on top.
- Sprinkle with cookie crumbs or chopped nuts for crunch.
- Chill for 30 minutes before serving for the best texture.
Helpful Tips
Cooking Tips
- Use slightly firm apples to prevent them from becoming mushy.
- Let the caramelized apples cool slightly before layering to prevent melting the pudding.
- Whip the cream until stiff peaks form for a light, fluffy texture.
Serving Suggestions
- ✅ Pair with a warm cup of coffee or tea.
- ✅ Serve with extra caramel drizzle for extra indulgence.
- ✅ Add a sprinkle of sea salt on top to enhance the caramel flavor.
- ✅ Enjoy with graham crackers or shortbread cookies on the side.
What Chefs Say About This Recipe
- Gordon Ramsay – “A beautifully layered dessert with a perfect mix of textures and flavors.”
- Martha Stewart – “This dessert combines all the cozy flavors of fall into an easy, no-bake treat.”
- Bobby Flay – “The caramelized apples and crunchy cookie layers take this to the next level.”
- Ina Garten – “Sweet, creamy, and perfectly spiced—this dessert is simply irresistible.”
- Jamie Oliver – “A simple yet elegant treat that’s perfect for entertaining.”
10 Frequently Asked Questions (FAQs)
- Can I make these ahead of time? Yes! Store them in the fridge for up to 3 days.
- Can I freeze them? No, the pudding and whipped cream won’t freeze well.
- How do I prevent the apples from getting too soft? Cook them just until tender, not mushy.
- Can I use Cool Whip instead of homemade whipped cream? Yes, but homemade has better flavor.
- What’s the best caramel sauce to use? Homemade or high-quality store-bought works best.
- Can I make this in a large dish instead of individual cups? Yes! Use a 9×9-inch dish and layer the ingredients.
- Can I use instant pudding mix? Yes! Just prepare it according to the package instructions.
- How do I add extra crunch? Sprinkle chopped pecans or toffee bits on top.
- Can I use butterscotch pudding instead of vanilla? Absolutely! It adds a richer flavor.
- What’s the best serving temperature? Chilled for at least 30 minutes for the best taste.
Nutritional Information (Per Serving)
- Calories: 340 kcal
- Carbohydrates: 42g
- Protein: 4g
- Fat: 18g
- Saturated Fat: 10g
- Sugar: 30g
Storage and Leftovers
Refrigerate
- Store in an airtight container in the fridge for up to 3 days.
Related Recipes
- Crispy Fish Batter Recipe
- Teriyaki Salmon Bowls
- Copycat Olive Garden Chicken Gnocchi Soup
- Oyster Stew – A Classic Comfort Dish
Conclusion
These Caramel Apple Dessert Cups are a quick, easy, and utterly delicious treat that combines the flavors of caramel apples, vanilla pudding, and crunchy cookies into a perfectly layered dessert. Whether you’re making them for fall gatherings, holiday dinners, or just a sweet treat at home, they’re sure to impress!
Try this recipe today and let us know how you liked it! 🍏🍮🍯😊
3- Reese’s Dessert Cups – The Ultimate No-Bake Chocolate & Peanut Butter Treat! 🥜🍫
Hello, Dessert Lovers!
If you love chocolate and peanut butter, get ready for the ultimate no-bake dessert! These Reese’s Dessert Cups combine a crunchy Oreo crust, a rich and creamy peanut butter filling, and a drizzle of chocolate sauce, all topped with mini Reese’s peanut butter cups for a decadent, mouthwatering treat.
These individual-sized dessert cups are perfect for parties, holidays, or whenever you need a quick and easy indulgence. No oven required—just mix, layer, and chill!
Introduction
Chocolate and peanut butter are one of the best dessert combinations ever, and Reese’s peanut butter cups have been a favorite for generations. This easy, no-bake dessert takes those classic flavors and turns them into a creamy, layered masterpiece that’s both smooth and crunchy, sweet and salty.
I first made these Reese’s Dessert Cups for a holiday party, and they were gone in minutes! The combination of the crunchy Oreo crust, silky peanut butter filling, and rich chocolate drizzle makes this dessert irresistible. Whether you’re making them for a special occasion or just a fun weeknight treat, they’re sure to impress!
Ingredients
To prepare these rich, creamy, and chocolate-drizzled Reese’s Dessert Cups, you’ll need:
For the Oreo Crust:
- 2 cups crushed Oreo cookie crumbs 🍪
- ¼ cup salted butter, melted 🧈
For the Creamy Peanut Butter Filling:
- 8 oz pack cream cheese, softened 🧀
- 1 cup powdered sugar
- 1 cup creamy peanut butter 🥜
- 1½ cups cold heavy whipping cream 🥛
- 1 tsp pure vanilla extract
For Topping & Garnish:
- Chocolate sauce, for drizzling 🍫
- 28 Reese’s peanut butter minis 🥜
Optional Substitutions & Additions:
- Want an extra crunch? Add chopped peanuts between layers.
- Prefer a different crust? Use graham crackers instead of Oreos.
- Need a nut-free option? Use cookie butter instead of peanut butter.
- Make it extra chocolatey! Mix in mini chocolate chips into the filling.
How to Make Reese’s Dessert Cups
Follow these easy steps to create your own delicious, peanut butter-packed dessert cups:
1️⃣ Make the Oreo Crust
- In a bowl, mix crushed Oreo cookie crumbs with melted butter.
- Divide the mixture evenly into small dessert cups and press down firmly to form a crust.
2️⃣ Prepare the Peanut Butter Filling
- In a large mixing bowl, beat cream cheese and powdered sugar until smooth.
- Add creamy peanut butter and continue mixing until well combined.
- In a separate bowl, whip the cold heavy whipping cream and vanilla extract until stiff peaks form.
- Gently fold the whipped cream into the peanut butter mixture until light and fluffy.
3️⃣ Assemble the Dessert Cups
- Spoon or pipe a layer of the peanut butter filling over the Oreo crust in each cup.
- Drizzle with chocolate sauce for extra richness.
- Repeat the layers if desired.
4️⃣ Garnish & Chill
- Top each dessert cup with a Reese’s peanut butter mini.
- Refrigerate for at least 2 hours before serving for the best texture.
5️⃣ Serve & Enjoy!
- Dig in and enjoy the creamy, crunchy, peanut buttery goodness!
Helpful Tips
Cooking Tips
- Use full-fat cream cheese for the creamiest texture.
- Whip the heavy cream until stiff peaks form before folding it into the filling.
- Chill for at least 2 hours to let the flavors meld beautifully.
Serving Suggestions
- ✅ Drizzle extra chocolate sauce or melted peanut butter for a finishing touch.
- ✅ Top with crushed Reese’s cups for more peanut butter flavor.
- ✅ Pair with a cold glass of milk for the ultimate dessert experience.
- ✅ Serve with a scoop of vanilla ice cream for extra indulgence.
What Chefs Say About This Recipe
- Gordon Ramsay – “A simple yet decadent dessert that perfectly balances peanut butter and chocolate.”
- Martha Stewart – “A no-bake masterpiece that’s both creamy and crunchy.”
- Bobby Flay – “The combination of whipped peanut butter filling and crunchy Oreo crust is perfection.”
- Ina Garten – “These dessert cups are rich, smooth, and incredibly satisfying.”
- Jamie Oliver – “A fantastic no-bake treat for any peanut butter lover.”
10 Frequently Asked Questions (FAQs)
- Can I make these ahead of time? Yes! They store well in the fridge for up to 3 days.
- Can I freeze them? Yes! Freeze for up to 2 months, then thaw in the fridge before serving.
- What’s the best way to crush Oreos? Use a food processor or crush them in a zip-top bag with a rolling pin.
- Can I use Cool Whip instead of homemade whipped cream? Yes, but homemade has a fresher taste.
- What if I don’t have mini Reese’s cups? Just chop up regular-sized Reese’s!
- Can I use crunchy peanut butter? Yes! It adds a nice texture.
- How do I make them extra chocolatey? Add cocoa powder to the peanut butter filling or mix in chocolate chips.
- Can I use a different cookie crust? Absolutely! Graham crackers or Biscoff cookies work great.
- Do I have to chill them before serving? Yes! Chilling helps set the layers for the best consistency.
- Can I make these in a large dish instead of cups? Yes! Layer everything in a 9×9-inch pan and cut into squares.
Nutritional Information (Per Serving)
- Calories: 380 kcal
- Carbohydrates: 36g
- Protein: 6g
- Fat: 24g
- Saturated Fat: 12g
- Sugar: 26g
Storage and Leftovers
Refrigerate
- Store in an airtight container in the fridge for up to 3 days.
Freeze
- Freeze in a sealed container for up to 2 months.
- Thaw in the fridge before serving.
Related Recipes
- Crispy Fish Batter Recipe
- Teriyaki Salmon Bowls
- Copycat Olive Garden Chicken Gnocchi Soup
- Oyster Stew – A Classic Comfort Dish
Conclusion
These Reese’s Dessert Cups are a quick, easy, and ridiculously delicious no-bake treat, combining the perfect mix of peanut butter, chocolate, and creamy goodness. Whether you’re making them for a party, holiday dessert, or just because, they’ll be a guaranteed hit!
Try this recipe today and let us know how you liked it! 🥜🍫😊