❄️🌲 Baking Soda Growing Trees – A Magical Crystal Science Experiment You Can Do at Home
If you love hands-on science projects that create beautiful, eye-catching results, this Baking Soda Growing Trees experiment is the perfect activity. With only a few basic household ingredients, you can grow sparkling white crystals that look like frost or snow forming on miniature trees. It’s simple, safe, and ideal for kids, classrooms, homeschool lessons, or anyone who enjoys creative DIY science.
What makes this experiment truly fascinating is the way it blends chemistry with visual art. As the water slowly evaporates, baking soda crystals begin to form along surfaces, turning pipe cleaners, twigs, or sponge trees into frosted, snow-covered landscapes. The process is mesmerizing and teaches children key scientific concepts such as saturation, evaporation, and crystal formation.
This project also appeals to readers who enjoy mindful, step-by-step activities — much like those who explore Mounjaro Recipes for structure and clarity. Both cooking and crystal-growing rely on patience, precise steps, and watching something simple transform into something impressive over time.
🌲 Materials You Will Need
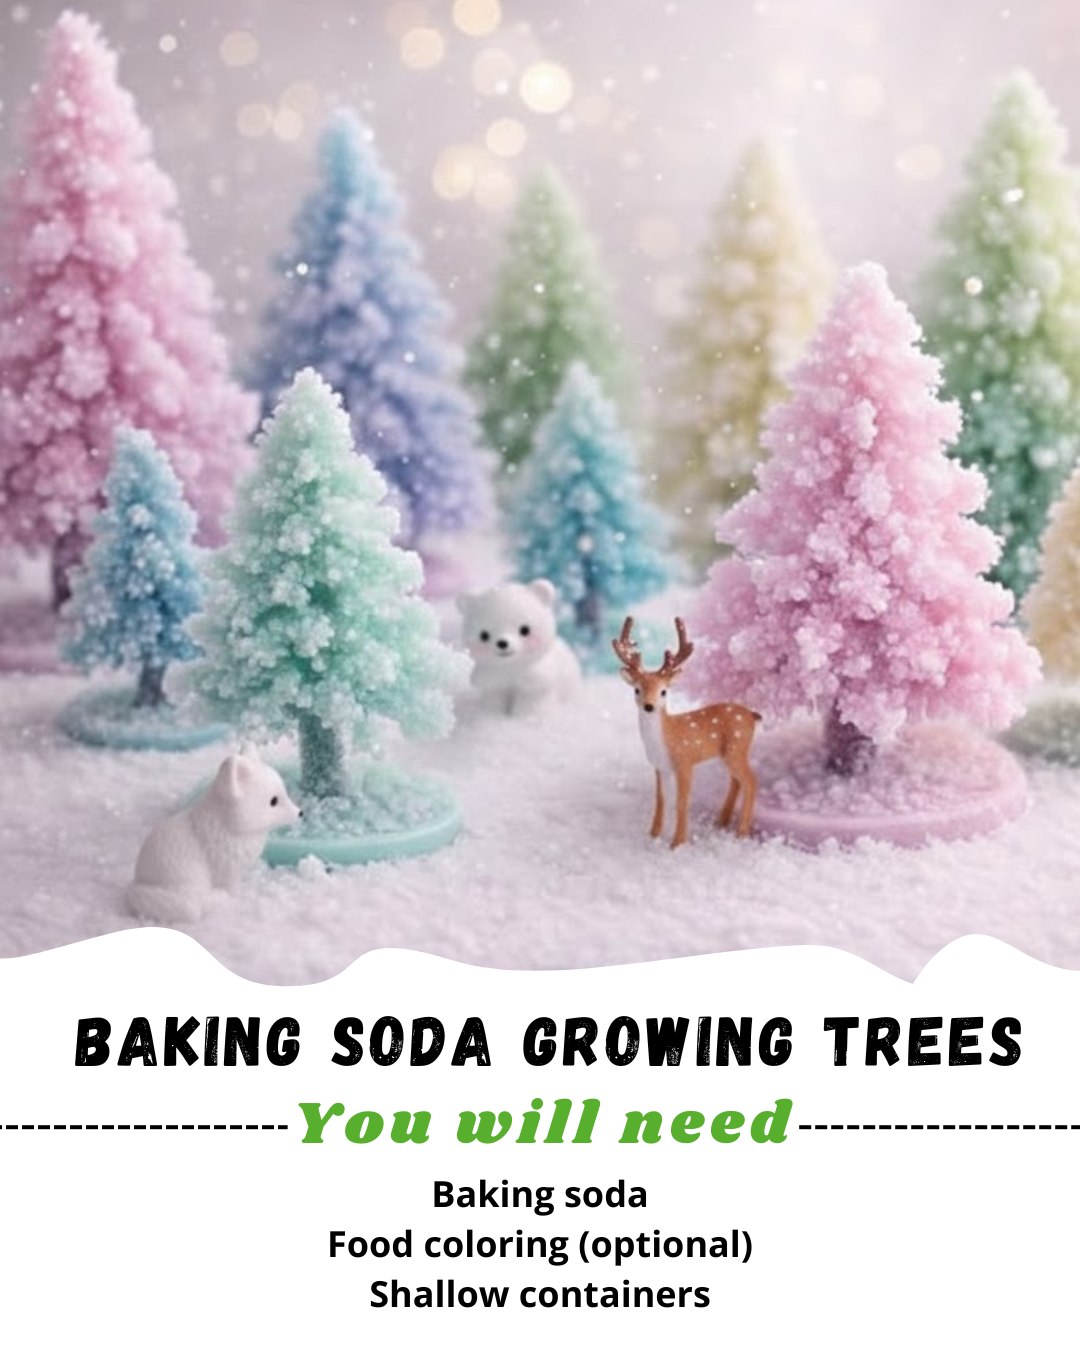
Baking soda (sodium bicarbonate)
Hot water
Shallow containers (plates, dishes, or foil-lined trays)
Spoon or stirrer
Food coloring (optional)
Optional “trees”:
Pipe cleaners shaped into trees
Small twigs
Sponges cut into tree shapes
Small toy figures or landscape pieces
🧪 Step-by-Step Instructions for Growing Baking Soda Trees
1. Prepare the Forest Base
Place your chosen “trees” inside a shallow dish or tray. You can stand pipe cleaner trees upright, position twigs like winter branches, or lay sponges shaped as pine trees. Arrange small plastic figures or landscape pieces if you want to create a miniature snowy scene. The crystal growth will naturally highlight the shapes and textures you add, so this is where creativity can shine.
2. Make a Saturated Baking Soda Solution
Heat 1 cup of water until very warm (but not boiling) and pour it into a bowl or measuring cup.
Gradually add ½ to ¾ cup baking soda while stirring continuously.
When a little bit of baking soda refuses to dissolve and settles at the bottom, you know the solution is fully saturated. This step is essential — only a saturated solution can grow crystals effectively.
The mixture may look cloudy, and that’s perfectly normal.
3. Add Food Coloring (Optional)
For colorful crystal trees, mix a few drops of food coloring into the solution.
You can make separate batches for different shades — white for snow, blue for icy crystals, or green for a frosty forest effect. Coloring is optional, but it adds a beautiful visual element, especially for holiday-themed projects.
4. Pour the Solution Into the Container
Slowly pour your saturated baking soda mixture into the shallow tray with your trees.
Make sure the bases of the objects are touching the liquid. You do not want to fully submerge them — only the lower portions need contact with the solution for crystals to “climb” upward as the water evaporates.
5. Grow the Crystals
Place the container somewhere dry, still, and undisturbed.
As the water evaporates, the magic begins:
• Baking soda starts crystallizing along every surface it touches
• Branches, pipe cleaners, twigs, or sponges slowly turn frosty
• The landscape transforms into a snowy, glittering crystal forest
Timing expectations:
• First crystals appear within a few hours
• Full crystal growth typically occurs overnight or within 24 hours
Slower evaporation results in larger, more dramatic crystals, while fast evaporation produces smaller, finer crystals.
6. Finish and Observe Your Crystal Forest
Once most of the water has evaporated, your project is complete.
The crystal trees will appear bright, frosty, and textured — like winter branches coated in snow.
The structures are delicate, so handle them gently. Kids love examining them up close and comparing shapes, sizes, and crystal patterns across different tree materials.
🔬 Science Behind the Magic
This experiment is an excellent opportunity to teach:
• Saturation – When water holds the maximum amount of dissolved baking soda
• Evaporation – Water leaves the container slowly, causing dissolved particles to form crystals
• Crystallization – Baking soda molecules bond together into solid structures as the water disappears
These scientific principles mirror the patience and step-by-step nature of many Mounjaro Recipes, where slow transformations and chemistry-based reactions lead to noticeable results over time.
💡 Tips for Best Crystal Growth
Use very hot water to dissolve more baking soda
Allow the container to sit in a warm, dry place
Avoid bumping or moving it during crystal formation
Experiment with different tree shapes and colors
Try multiple containers for side-by-side comparisons
📌 Final Thoughts
This Baking Soda Growing Trees project is more than a science experiment — it’s an artistic, hands-on way to learn about chemistry while creating a beautiful, winter-themed display. Kids and adults alike enjoy watching crystals develop and transform ordinary materials into sparkling snowy landscapes. Whether you’re teaching a lesson, crafting with your family, or simply trying a mindful activity alongside exploring Mounjaro Recipes, this experiment offers creativity, learning, and a magical visual payoff.